


Key Highlights
Here are the key takeaways for creating amazing listing photos:
- Properly preparing your home by decluttering and deep cleaning is the first step in successful real estate photography.
- Maximizing natural light and using smart lighting techniques will make your photos more inviting to potential buyers.
- Staging your home helps buyers visualize the lifestyle it offers by highlighting its best features.
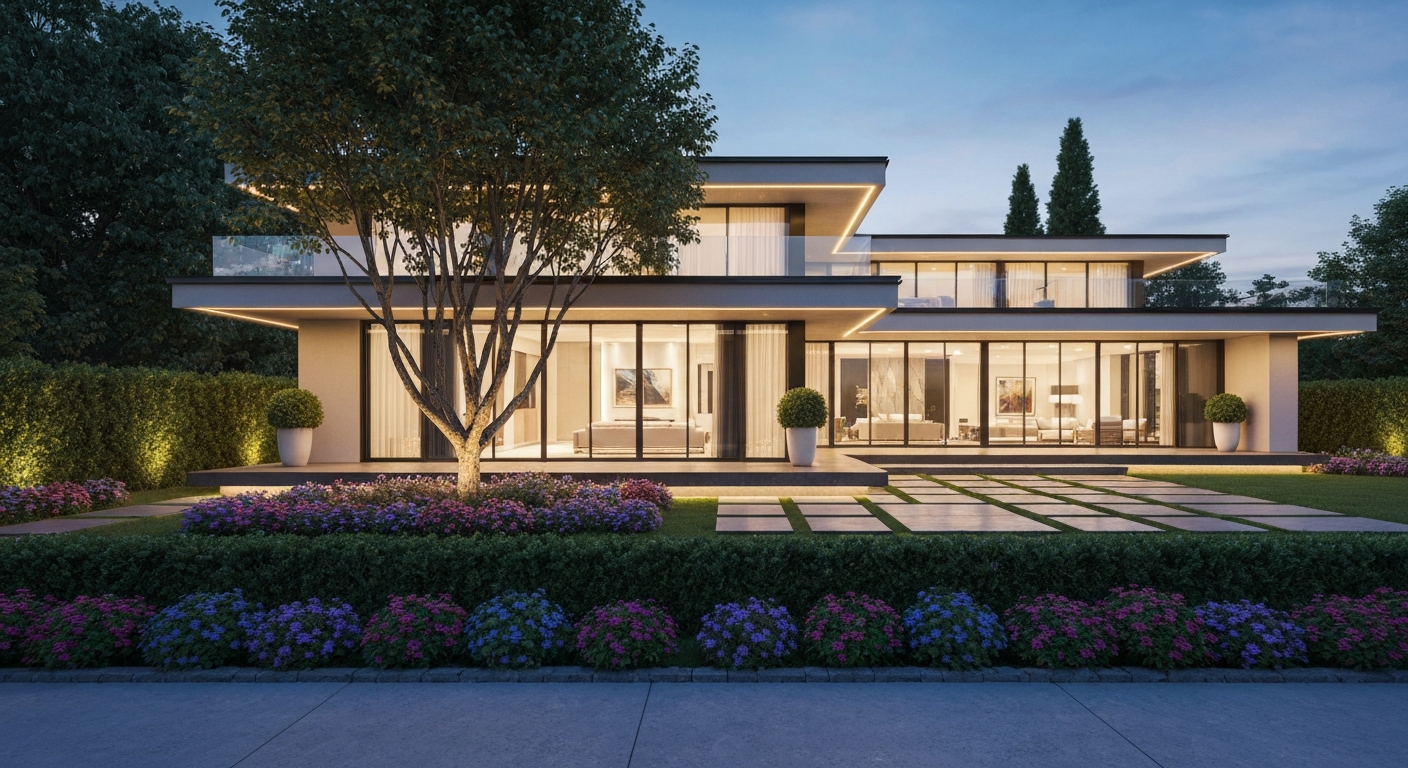
- Enhancing your home's curb appeal is essential, as the exterior shot is often the first thing buyers see.
- Hiring a professional ensures you get high-quality images that present your property in the best possible way.
Introduction
In today's competitive real estate market, your property's photos are its first introduction to potential buyers. High-quality real estate photography is no longer a luxury—it's a necessity. These images are your single best tool for making a strong first impression and capturing the interest of house hunters scrolling through online listings. Great photos can make your home look more appealing, spacious, and inviting, encouraging more buyers to schedule a showing and ultimately leading to a faster sale.
10 Essential Tips for Stunning Listing Photos
Are you ready to make your home shine online? Creating stunning listing photos is one of the most critical parts of your real estate marketing strategy. Before the photo shoot begins, a little preparation can go a long way toward attracting potential buyers and setting your property apart from the competition.
Whether you decide to tackle the photos yourself or invest in professional real estate photography, these essential tips will help you capture your home's best side. From cleaning and staging to choosing the right angles, let's explore how you can produce images that get results.
1. Declutter and Deep Clean Every Room
One of the most impactful things you can do before a real estate photo shoot is to declutter and deep clean every single room. Clutter is distracting and can make spaces appear much smaller than they actually are. Your goal is to help potential buyers envision themselves living in the home, which is hard to do when it’s filled with your personal belongings.
Start by clearing off all surfaces, especially in the kitchen and bathrooms. Remove magnets from the fridge, put away small appliances, and clear countertops of everything but one or two simple decorative items. A thorough cleaning is just as important. Wipe down all surfaces, polish fixtures, and make sure every room is spotless before the photographer arrives.
This preparation makes a huge difference in the final real estate photo. A clean, open space looks more inviting and allows the home's features to take center stage, which is exactly what you want to show potential buyers.
2. Maximize Natural Light and Use the Right Lighting Techniques
Good lighting is non-negotiable for great real estate photos. Bright, well-lit rooms feel larger, warmer, and more welcoming. The best way to achieve this is by maximizing natural light. Before the photo shoot, open all the blinds, curtains, and shades in every room to let the sunlight pour in. Don't worry if the light seems too harsh; a professional photographer can adjust the window coverings to get the perfect shot.
In addition to natural light, don't forget about artificial lighting. Go through your home and turn on every single light, including lamps, ceiling fixtures, and under-cabinet lighting. This helps fill in any dark spots and creates a cozy, inviting atmosphere. Also, take a moment to replace any burned-out light bulbs to ensure every corner of the home is shown in the best possible light.
The time of day for your photo shoot can also affect the lighting. Early morning or late afternoon often provides a soft, warm glow that is very flattering. Proper lighting will make your home's best features pop and create photos that grab buyers' attention.
3. Highlight Key Features and Unique Selling Points
Every home has something special about it. Your real estate marketing photos should focus on highlighting these unique selling points to capture the interest of potential buyers. Does your home have a beautiful fireplace, custom-built shelving, or a stunning kitchen island? Make sure these are the stars of your photos.
Before the photographer arrives, take a walk through your home and identify its best features. Think about what made you fall in love with the house in the first place. It could be the gorgeous hardwood floors, the large picture window in the living room, or the luxurious master bathroom.
Communicating these key features to your photographer will help them focus on what makes your property stand out. By showcasing the home’s best features, you create an emotional connection with buyers and give them compelling reasons to want to see more. It's these standout details that often make a listing memorable.
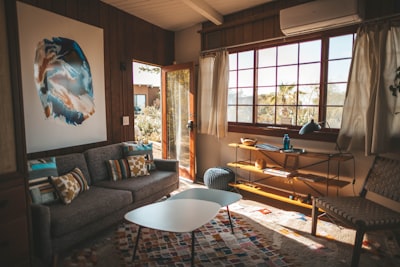
4. Stage Spaces to Appeal to Buyers’ Lifestyles
Staging is about more than just cleaning; it’s about creating a scene that allows buyers to imagine their life in your home. This process involves arranging furniture and decor to show off each room's potential. Proper staging can make a space feel larger, more functional, and more appealing in photos.
Start by removing oversized or unnecessary furniture to improve the flow and create more open space. The living room should feel cozy and conversational, while an extra bedroom could be staged as a home office to showcase its versatility. The goal is to create an inviting atmosphere that appeals to a wide range of tastes.
A critical part of staging is depersonalizing the space. Remove personal items like family photos, collections, and keepsakes. When buyers see too many of your personal things, it's harder for them to picture the house as their own. A neutral, beautifully staged home photographs better and helps buyers connect with the property on an emotional level.
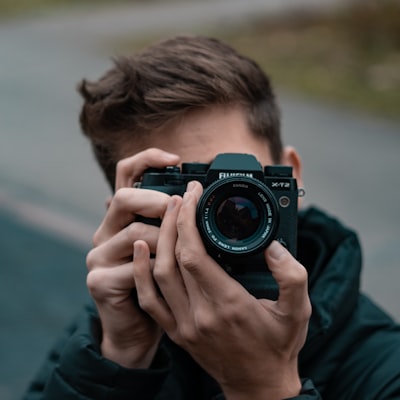
5. Use Professional Equipment or High-Quality Cameras
The camera on your smartphone has come a long way, but for the best results in real estate photography, professional equipment often makes a significant difference. High-quality cameras, especially those with wide-angle lenses, are designed to capture a room in a way that makes it feel spacious and true to life.
Professional photographers use techniques like HDR (High Dynamic Range) photography, which involves blending multiple exposures to create one perfectly lit image. This method ensures that bright areas like windows aren't blown out and dark corners are clearly visible. Using a tripod is also essential to get sharp, crisp images and avoid any blurriness.
If you’re taking the photos yourself, invest in or borrow a good DSLR camera and a tripod. If not, hiring a professional who already has the right gear is a wise investment. Using professional equipment is key to achieving a polished, professional look that will make your listing stand out.
6. Select the Best Angles and Compositions for Each Room
How you frame a shot is just as important as what's in it. Choosing the best angles for each room can dramatically change how a space is perceived in photos. The goal is to create a sense of space and flow, making rooms look as large and inviting as possible.
A great technique is to shoot from a corner of the room, which allows you to capture three walls in the frame. This gives a more comprehensive view of the space and its layout. Always shoot from chest level (about five feet from the floor) to avoid distorting the room's proportions. Shooting too low or too high can make the room feel skewed and unnatural.
During the photo shoot, take multiple shots from different angles to give yourself options later. Experiment with straight-on shots for symmetrical features like fireplaces or kitchen islands. Finding the best angles helps you present your home in a way that appeals to a broader audience and showcases its full potential.
7. Enhance Curb Appeal and Outdoor Spaces
Your home's exterior is the first thing buyers see in an online listing, so making a great first impression is crucial. Strong curb appeal can entice buyers to click through the rest of your photos. Before the photo shoot, spend some time sprucing up your yard and outdoor space.
A little landscaping work goes a long way. Mow the lawn, trim overgrown bushes, pull weeds, and add fresh mulch to flower beds. Make sure walkways and patios are swept clean of leaves and debris. If you have outdoor furniture, arrange it to look inviting. Here are a few simple tasks to complete:
- Hide garbage cans, garden hoses, and lawn equipment.
- Remove all vehicles from the driveway and the street in front of the house.
- Open up patio umbrellas and arrange outdoor furniture neatly.
A tidy and attractive outdoor space suggests that the home has been well-maintained. A picture-perfect exterior shot can grab a buyer's attention and make them excited to see what's inside.
8. Remove Personal Items and Minimize Distractions
To help potential buyers imagine your house as their future home, you need to make it as neutral as possible. This means removing all personal items and things that could cause distractions in the photos. When buyers see your family photos on the wall, it reminds them that they are in someone else's space.
Go through each room and pack away personal belongings. This includes family photos, children's artwork, refrigerator magnets, and any personal collections or keepsakes. The goal is to create a clean slate so buyers can focus on the home itself, not the people who live there.
By taking the time to minimize distractions, you allow the home's best features to shine. A depersonalized space feels more like a model home—aspirational, clean, and ready for a new owner. This simple step can make a huge difference in how potential buyers connect with your property.
9. Edit Photos Carefully to Enhance but Not Mislead
After the photo shoot, the editing process is where your images are polished to perfection. When you edit photos, the goal is to make them look bright, crisp, and true to life. Basic adjustments like correcting the white balance, brightening the image, and straightening lines can dramatically improve the quality of your real estate photos.
However, it's important to enhance, not deceive. Avoid overediting or using filters that make the property look unrealistic. Misrepresenting your home can lead to disappointment when buyers see it in person, which can damage trust and hurt your chances of a sale. The colors should look natural, and the features of the home should be accurately represented.
For the best results, aim for a clean and professional look. If you're not comfortable with photo editing software, this is another area where a professional photographer's skills are invaluable. Careful editing can make your photos pop without crossing the line into misleading territory.
10. Consider Hiring a Professional Real Estate Photographer
While it's possible to take your own listing photos, hiring a professional photographer is often one of the best investments you can make when selling your home. Professional real estate photographers have the experience, equipment, and artistic eye to capture your home in the best possible way.
These professionals understand lighting, composition, and angles. They know how to highlight a home's strengths and minimize its weaknesses. They also have access to high-end cameras, lenses, and editing software to produce stunning, high-resolution images that will make your listing stand out online.
Ultimately, professional real estate photography can help you attract more buyers, get more showings, and potentially sell your home faster and for a better price. If your budget allows, leaving this crucial task to an expert is a smart move that often pays for itself.
Preparing Your Home for a Real Estate Photo Shoot
Getting your home ready for a real estate photoshoot can feel like a big project, but proper planning makes all the difference. Preparing your home thoroughly ensures that the photographer can capture its best features without delays or distractions, resulting in photos that impress potential buyers.
From cleaning and organizing key areas to arranging furniture, every detail matters. The following tips will guide you through the final steps of getting your home picture-perfect for its big debut on the market.
Cleaning and Organizing Key Areas: Kitchen, Bathrooms, and Living Spaces
The kitchen, bathrooms, and main living spaces are often the most scrutinized areas in listing photos, so they deserve special attention. Start with a deep cleaning and organizing session in these key rooms. In the kitchen, clear everything off the countertops to showcase the space. Wipe down all appliances, sinks, and backsplashes until they sparkle.
In the bathrooms, remove all personal items like toothbrushes, shampoo bottles, and soaps from the counters, tubs, and showers. A clean, hotel-like bathroom feels fresh and spacious. Neatly folded towels can add a touch of warmth without creating clutter.
Remember that potential buyers will be curious about storage areas. While you don't need to photograph the inside of every closet, a cluttered entryway can give the impression that the home lacks storage. Tucking away shoes and jackets will help make these spaces look clean and functional, reinforcing the home’s best features.
Arranging Furniture to Create an Inviting Atmosphere
The way your furniture is arranged has a huge impact on how a room feels in a photograph. The goal of arranging furniture for a photo shoot is to create an inviting atmosphere and emphasize the flow of the space. Often, this means removing some pieces to make a room feel more open and spacious.
In the living room, pull furniture away from the walls to create a more intimate and conversational grouping. This can actually make the room look larger. Ensure that there are clear walking paths through each room, as this helps buyers understand the layout and flow of the home. Here are a few tips:
- Remove bulky or oversized furniture that overwhelms the space.
- Take up any floor mats or small runners, which can make floors look smaller.
- Consult a stager if you're unsure whether a large area rug helps or hinders the room's look.
Thoughtful furniture arrangement can transform a room from feeling cramped to feeling airy and welcoming, which is exactly the impression you want to make.
Tips for Managing Pets and Children During the Photo Session
For the smoothest and most efficient photo session, it's best if the home is empty. Managing pets and children during the shoot can create distractions and slow down the photographer's creative process. It's a good idea to plan an outing for the day of the shoot.
Before the photographer arrives, make sure to hide all evidence of pets. Put away food and water bowls, toys, beds, and litter boxes. Not all potential buyers are animal lovers, and some may have allergies, so presenting a pet-free space is ideal. Similarly, make sure children’s toys are neatly stored away to keep rooms looking tidy.
Many professional photographers use 3D imaging technology that captures every part of the home. If people or pets are moving around, they could accidentally appear in the photos or virtual tour. Giving the photographer an empty house to work in allows them to focus without interruptions and ensures a polished, professional final product.
Common Mistakes to Avoid in Listing Photos
Even with the best intentions, it’s easy to make mistakes that can weaken the impact of your listing photos. These common errors in real estate photography can make your home look less appealing and may even turn potential buyers away before they’ve had a chance to appreciate its best qualities.
From poor lighting to too much clutter, being aware of these pitfalls is the first step to avoiding them. Let's look at some of the most frequent mistakes made during a photo shoot and how you can prevent them.
Overediting or Using Unrealistic Filters
One of the biggest mistakes in editing real estate photos is taking it too far. While a little enhancement is good, overediting can make your property look fake and misrepresent its true condition. Using unrealistic filters or cranking up the color saturation can create a jarring, unnatural look that undermines the professional look you're aiming for.
The goal of editing is to make the home look its best, not to make it look like a completely different property. If you edit the photos to the point where the lawn is an unnatural shade of green or the walls look like a different color, you're setting up buyers for disappointment when they visit in person.
Keep your edits subtle and focused on making the photo look clean, bright, and accurate. Stick to basic adjustments like brightness, contrast, and straightening lines. Authenticity is key in real estate photos; buyers appreciate an honest representation of the home.
Including Clutter or Unfinished Projects in Shots
Nothing distracts from a home's best features like clutter. Including personal belongings, messy countertops, or disorganized spaces in your photos is a surefire way to make a bad impression. Before the photo shoot, you must do a thorough sweep of every room to ensure it is free of clutter.
Another common mistake is showing unfinished projects. A half-painted wall, a stack of flooring in the corner, or exposed wiring can signal to buyers that the home requires work, which can be a major turn-off. Make sure any repairs or renovations are completed before you schedule the photography session.
Your listing photos should present a polished, move-in-ready home. Taking the time to finish projects and clear away all clutter allows the photographer to focus on capturing the home's positive attributes, helping buyers see the property's full potential instead of its flaws.
Poor Lighting Choices and How to Fix Them
Poor lighting is one of the most common issues in amateur real estate photography. Photos that are too dark can make a home feel gloomy and small, while harsh shadows can hide important details. Achieving proper lighting is a balance between using natural light and supplementing with artificial lighting.
Before the photo shoot, open all the blinds and turn on every light in the house. This simple step can instantly make rooms feel brighter and more welcoming. It’s also important to replace any burned-out bulbs to avoid creating distracting dark spots in your photos.
A professional photographer will know how to manage different lighting situations, but if you're doing it yourself, be mindful of these common issues. Here’s how to fix them:
- Lighting Problem: Dark Corners or Rooms
How to Fix It: Turn on all lamps and overhead lights. Add floor lamps for upward lighting if needed. - Lighting Problem: Harsh Shadows
How to Fix It: Shoot on a slightly overcast day or use a flash bounced off the ceiling to soften light. - Lighting Problem: Glare on Windows/Mirrors
How to Fix It: Change your shooting angle. A polarizing filter can also help reduce reflections. - Lighting Problem: Uneven Lighting
How to Fix It: Use HDR photography to blend multiple exposures for a perfectly balanced photo.
Advanced Tips to Make Your Listing Photos Stand Out
Once you've mastered the basics, you might be looking for ways to take your listing photos to the next level. A few advanced tips can help your property truly stand out from the competition and capture the imagination of buyers in a crowded market.
From showcasing an empty home with virtual staging to creating an immersive experience with virtual tours, these modern techniques can add a wow factor to your real estate marketing and leave a lasting impression on anyone viewing your listing.
Using Virtual Staging and Virtual Tours
What do you do when a property is completely empty? Virtual staging is an innovative solution that digitally adds furniture and decor to photos of vacant rooms. This helps buyers visualize the space's potential and understand how furniture might fit, making an empty house feel like a home. It's a cost-effective alternative to physical staging and a powerful tool for real estate marketing.
In addition to static photos, virtual tours offer an immersive, 3D experience that allows buyers to "walk through" the property from their own computer or phone. Unlike traditional photos that show a single perspective, virtual tours provide a comprehensive view of the home's layout and flow, giving buyers a much better sense of the space.
Offering these advanced features in your online listings can attract more serious buyers and help your property stand out. They provide a level of detail and engagement that traditional photos alone cannot match, making your listing more memorable and appealing.
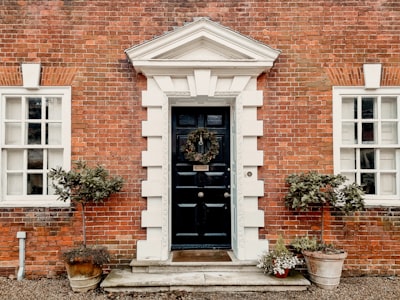
Incorporating Seasonal Touches for Added Appeal
Adding subtle seasonal touches to your home's decor can make it feel current, warm, and inviting in photos. This doesn't mean you should put up holiday decorations, but small, tasteful additions can enhance the home's appeal and create a lasting impression.
For example, in the fall, a simple wreath on the door or a pot of mums on the porch can add a cozy touch to your curb appeal. In the spring or summer, a vase of fresh flowers on the kitchen table or colorful pillows on the patio furniture can make the space feel bright and vibrant. These small details help showcase the home in the best possible light.
The key is to keep it simple and elegant. These seasonal touches can breathe life into your photos and help buyers connect with the home on an emotional level by showing it as a welcoming and well-cared-for space, no matter the time of year.
Conclusion
In conclusion, stunning listing photos are essential in capturing potential buyers' attention and making your property stand out in a competitive market. By implementing the ten essential tips discussed, from decluttering and maximizing natural light to considering professional help, you can create inviting visuals that highlight your home's best features. Remember, the goal is to evoke emotion and inspire buyers to envision themselves living in the space. So as you prepare for your real estate photo shoot, take the time to carefully plan and execute each aspect to present your property in the best light possible. For more personalized guidance on elevating your listing photos, don’t hesitate to reach out for a free consultation!


